
Vue TinyMCE 编辑器组件文档
目录
概述
创建了一个 Vue 和 TinyMCE 构建的博客文章编辑器组件。它包含图片上传和文章保存功能,可以轻松集成到各种 Vue 应用中。
后端代码
后端使用 Flask 框架,提供两个 API 接口:图片上传和文章保存。
from flask import Flask, request, jsonify
import requests
import uuid
import os
from flask_cors import CORS

app = Flask(__name__)
CORS(app)  # 允许跨域请求

NGINX_URL = "文件服务器url"
NGINX_USER = ""
NGINX_PASSWORD = ""

@app.route('/upload-image', methods=['POST'])
def upload_image():
    if 'file' not in request.files:
        return jsonify({"error": "No file part"}), 400
    file = request.files['file']
    if file.filename == '':
        return jsonify({"error": "No selected file"}), 400

    # 生成UUID作为文件名
    filename = f"{uuid.uuid4()}{os.path.splitext(file.filename)[1]}"

    # 上传到Nginx文件服务器
    response = requests.put(
        f"{NGINX_URL}/{filename}",
        data=file.read(),
        auth=(NGINX_USER, NGINX_PASSWORD),
        headers={"Content-Type": file.content_type}
    )

    if response.status_code == 201:
        print(f"http://文件服务器/files-get/{filename}")
        return jsonify({"url": f"http://文件服务器/files-get/{filename}"})
    else:
        return jsonify({"error": "Failed to upload file"}), 500

@app.route('/save-post', methods=['POST'])
def save_post():
    content = request.json.get('content')
    if not content:
        return jsonify({"error": "No content provided"}), 400

    # 在实际应用中,这里会将内容保存到数据库
    # 现在我们只是打印出来
    print("Saved post content:", content)

    return jsonify({"message": "Post saved successfully"})

if __name__ == '__main__':
    app.run(debug=True)
后端接口详解
图片上传接口 (
/upload-image)- 方法:POST
- 功能:接收图片文件,上传到 Nginx 文件服务器,返回可访问的 URL
- 处理流程:
- 检查请求中是否包含文件
- 生成唯一的 UUID 作为文件名
- 使用 requests 库将文件上传到 Nginx 服务器
- 如果上传成功(状态码 201),返回文件的访问 URL
- 如果上传失败,返回错误信息
- 返回:
- 成功:
{"url": "http://ip/files-get/[UUID].[ext]"} - 失败:
{"error": "错误信息"}
- 成功:
文章保存接口 (
/save-post)- 方法:POST
- 功能:接收文章内容,(模拟)保存到数据库
- 处理流程:
- 从请求的 JSON 数据中获取 content 字段
- 检查 content 是否为空
- 打印接收到的内容(在实际应用中,这里会保存到数据库)
- 返回保存成功的消息
- 返回:
- 成功:
{"message": "Post saved successfully"} - 失败:
{"error": "No content provided"}
- 成功:
前端代码
前端使用 Vue 和 TinyMCE 创建编辑器组件。(一定要注意,申请一个自己的apikey!https://www.tiny.cloud/my-account/integrate)
<template>
  <div class="post-editor">
    <h1 class="editor-title">博客帖子编辑器</h1>
    <div class="editor-header">
      <input v-model="title" placeholder="输入标题" class="title-input" />
      <button @click="savePost" class="save-button">保存帖子</button>
    </div>
    <div class="tinymce-container">
      <Editor
        :api-key="apiKey"
        :init="editorConfig"
        v-model="content"
      />
    </div>
  </div>
</template>

<script>
import Editor from '@tinymce/tinymce-vue'
import axios from 'axios'

export default {
  name: 'PostEditor',
  components: {
    Editor
  },
  data() {
    return {
      title: '',
      content: '',
      apiKey: '你的apikey',
      editorConfig: {
        height: 500,
        width: 1000,
        menubar: false,
        plugins: [
          'advlist autolink lists link image charmap print preview anchor',
          'searchreplace visualblocks code fullscreen',
          'insertdatetime media table paste code help wordcount'
        ],
        toolbar: 'undo redo | formatselect | bold italic backcolor | \
          alignleft aligncenter alignright alignjustify | \
          bullist numlist outdent indent | removeformat | help | image',
        images_upload_handler: this.handleImageUpload,
        language_url: '/tinymce/langs/zh_CN.js',
        language: 'zh_CN',
        skin: 'oxide'
      }
    }
  },
  methods: {
    async handleImageUpload(blobInfo, success, failure) {
      const formData = new FormData()
      formData.append('file', blobInfo.blob(), blobInfo.filename())

      try {
        const response = await axios.post('http://localhost:5000/upload-image', formData)
        success(response.data.url)
      } catch (error) {
        failure('图片上传失败: ' + error.message)
      }
    },
    async savePost() {
      try {
        await axios.post('http://localhost:5000/save-post', {
          title: this.title,
          content: this.content
        })
        alert('帖子保存成功!')
      } catch (error) {
        alert('保存失败: ' + error.message)
      }
    }
  }
}
</script>

<style scoped>
.post-editor {
  max-width: 1000px;
  margin: 0 auto;
  padding: 20px;
}

.editor-title {
  text-align: center;
  margin-bottom: 20px;
  color: #333;
}

.editor-header {
  display: flex;
  justify-content: space-between;
  align-items: center;
  margin-bottom: 20px;
}

.title-input {
  flex-grow: 1;
  margin-right: 20px;
  padding: 10px;
  font-size: 18px;
  border: 1px solid #ddd;
  border-radius: 4px;
}

.save-button {
  padding: 10px 20px;
  font-size: 16px;
  background-color: #4CAF50;
  color: white;
  border: none;
  border-radius: 4px;
  cursor: pointer;
}

.save-button:hover {
  background-color: #45a049;
}

.tinymce-container {
  max-width: 1000px;
  margin: 0 auto;
}

:deep(.tox-tinymce) {
  max-width: 100%;
}

:deep(.tox-notifications-container) {
  display: none;
}

:deep(.tox.tox-silver-sink.tox-tinymce-aux) {
  z-index: 2100 !important;
}
</style>
关键功能解析
图片上传处理:
- 后端生成唯一的 UUID 作为文件名,确保文件名不重复。
- 前端使用
handleImageUpload方法处理图片上传,将图片数据发送到后端。
TinyMCE 编辑器配置:
editorConfig: {
  // ... 其他配置项
  images_upload_handler: this.handleImageUpload,
}
这里配置了 TinyMCE 编辑器,特别是自定义的图片上传处理函数,使编辑器能够直接上传图片。
Vue 组件数据绑定: 使用
v-model="content"双向绑定编辑器内容,使得父组件可以轻松获取和设置编辑器内容。异步操作处理: 使用
async/await语法处理图片上传和文章保存的异步操作,提高代码可读性和错误处理能力。TinyMCE 傻逼布局问题的解决: TinyMCE 编辑器默认的布局存在一些问题,可能会影响用户体验。以下是遇到的主要问题和解决方案:
问题描述:TinyMCE 编辑器的默认布局不够灵活,难以适应不同的容器大小,有时会出现意外的滚动条或布局错乱。
解决思路:
- 限制编辑器的最大宽度
- 使用 CSS 来控制编辑器的响应式行为
- 覆盖一些 TinyMCE 默认样式
具体方案:
.tinymce-container { max-width: 1000px; margin: 0 auto; } :deep(.tox-tinymce) { max-width: 100%; } :deep(.tox-notifications-container) { display: none; } :deep(.tox.tox-silver-sink.tox-tinymce-aux) { z-index: 2100 !important; }方案解释:
.tinymce-container类限制了编辑器的最大宽度,并使其居中。:deep(.tox-tinymce)确保编辑器不会超出其容器。- 隐藏了可能干扰用户的通知容器。
- 调整了一些弹出元素的 z-index,以确保它们正确显示。
这种方法解决了 TinyMCE 那傻逼般的默认布局问题,使编辑器更好地适应不同的页面布局和容器大小。
响应式设计考虑: 除了解决 TinyMCE 的布局问题,整个组件的设计也考虑了响应式布局:
.post-editor {
  max-width: 1000px;
  margin: 0 auto;
  padding: 20px;
}

.editor-header {
  display: flex;
  justify-content: space-between;
  align-items: center;
  margin-bottom: 20px;
}

.title-input {
  flex-grow: 1;
  margin-right: 20px;
}
这些样式确保了编辑器组件在各种屏幕尺寸下都能保持良好的布局和可用性。
使用指南
在其他 Vue 页面中使用这个编辑器组件的步骤:
安装必要的包:
npm install @tinymce/tinymce-vue@^4 axios复制组件文件: 将
PostEditor.vue文件复制到你项目的components目录。导入组件: 在需要使用编辑器的 Vue 文件中添加以下代码:
import PostEditor from '@/components/PostEditor.vue'注册组件: 在 Vue 组件中添加以下代码:
export default { components: { PostEditor }, // ...其他代码 }使用组件: 在模板中添加以下代码:
<template> <div> <h1>创建新文章</h1> <PostEditor /> </div> </template>自定义配置(可选): 你可以向
PostEditor组件传递自定义配置,例如:<PostEditor :custom-height="700" @save="handleSave" />记得在
PostEditor组件中添加相应的 props 和事件处理逻辑。
按照这些步骤,你可以在任何 Vue 页面中添加这个博客文章编辑器组件。
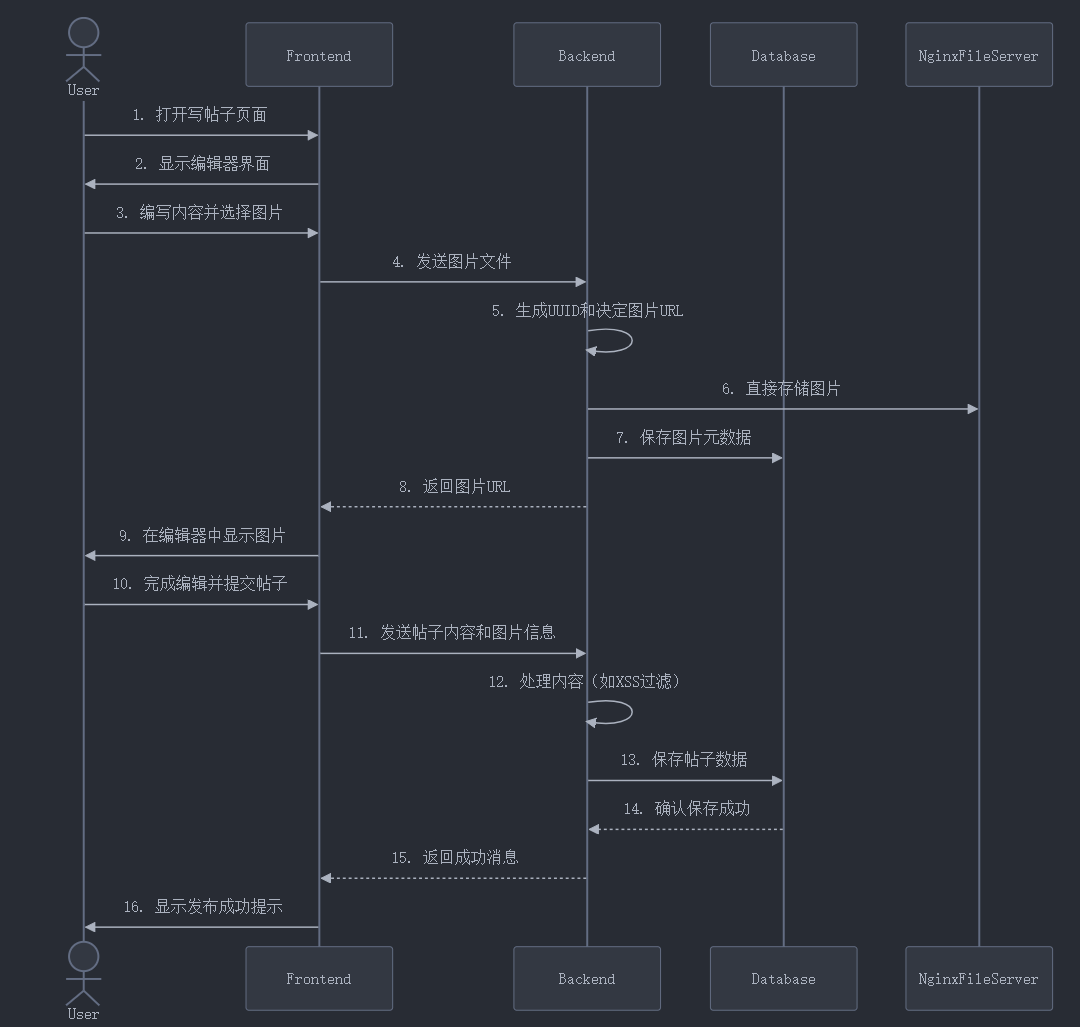
时序图


评论区